Saturday, December 28, 2013

Preparing for Power: Installing the firewall mat, fuel tanks, pumps and filters.

As engine installation is looming near it is time to start getting the engine bay ready to accept its power plant. This includes the installation of some of the many restored components including the fuel tanks, fuel pumps, fuel filter, as well as some other ancillary components.

With lots to look at we will keep this a photo heavy post. Enjoy.

Here is the completed Fuel tank, pump, & filter assembly with all hoses and clamps installed. Close inspection of period photos confirmed without doubt that the fuel hoses were rubber on the outside and not cloth as is often fitted (and correct to later Ferrari's) during restorations.


Original Bendix design fuel pumps were sourced. These are identifiable by the manner that the wire comes out of the case which differs markedly from the newer electric Facet units. Another difference is in the internal design as these pumps make a distinctive clicking sound as they fill while the newer pumps just produce a steady whirr. Getting the right pumps was hard but will add to the period feeling with every engine start.


Correct Serflex Minus clamps were used throughout.


Another detail not overlooked was the wrapping of the wires between the fuel pumps and the chassis. Again period photos were referenced to get the wrap looking correct. Dino's used very few plastic tie wraps anywhere and where they did they were made by the company Colson. On the fuel pumps a singular Colson tie wrap is used to bundle the wires and it goes on the lower hose that joins the 2 pumps together.


The completed fuel tanks shown installed from the passenger side. Their full restoration was chronicled in previous blog posts.


Fuel tanks and firewall as seen from the drivers side


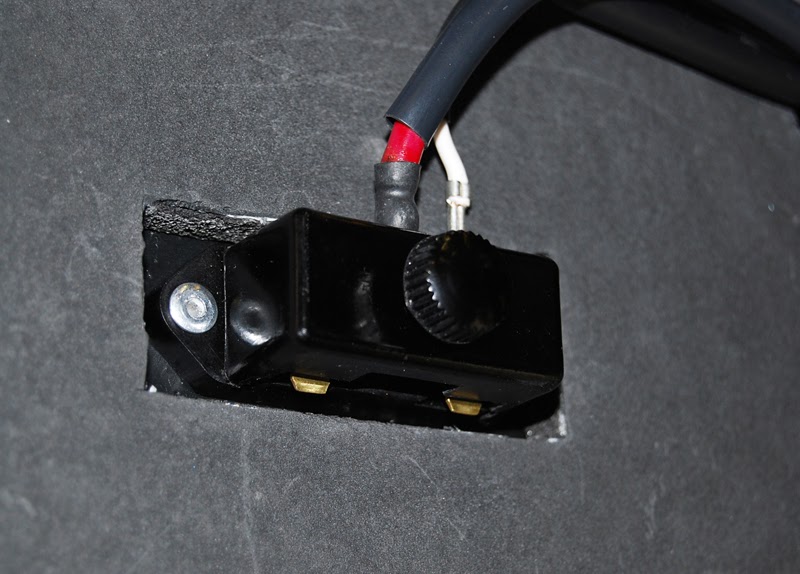
Close up of Alternator junction block. Later cars used a larger junction that contained 2 fuses while earlier cars used a junction without fuses that was riveted to the fiberglass firewall panel.


Again original Serflex hose clamps are used on the fuel tanks. The parts book shows these oriented horizontally but period photos show them vertically installed (as shown). We opted for vertical installation because it is factory correct and allows for easy access to check tightness when the engine is installed.


The fuel transfer pipe had its original SAIAG stamp faithfully reproduced and re-applied. The fuel drain plug was also safety wired in place as per factory delivery.

In many of the photos the firewall matting is visible. While later E series Dino's used an exposed aluminum firewall, earlier Dino's used a foam covering. This material has not been available from Ferrari in decades and was terribly fragile even when new. The original material was made up of soft open cell foam with a crusty and lightly textured outer coating encased in a mesh re-enforcement.

Through intensive research and extensive testing we were able to come up with a procedure to re-manufacture this firewall matting. The final result is nothing short of spectacular as our custom blend uses modern materials to produce a mat that is infinitely more durable and functional than original while maintaining a 100% concours correct look. It truly is the best of both worlds marrying function and form.

Wednesday, December 25, 2013

Christmas is here but the elves are hard at work

Last year we wrote of leather, rug, and paint samples under the tree and this year the paint is done and upholstery is back which leaves the elves (us) working overtime to finish the Dino. Despite this schedule come back and visit us because from time to time we will take an eggnog break to share images of our progress. For now we would like to wish a Merry Christmas to all of our followers worldwide.

Wednesday, December 18, 2013

Original vs. Replacement: The difference in voltage regulators and their markings

It seems as though we are always learning something new. Recently we decided to reproduce the little red decal that goes on the alternator voltage regulator. These are not available anywhere and it is impossible to properly restore the regulator cover without destroying the original decal. Despite the fact that the regulator is in plain sight on the fuse panel this is a part that is often overlooked by restorers making the whole panel look a little dingy.

While doing the artwork for the decal we made an interesting discovery and further research proved our observation to be correct. The voltage regulators delivered to Ferrari on the assembly line had the word FIAT stamped on the cover. These parts were made by Magnetti Marelli and when they broke (as they often did) they were replaced with regulators that carried the MM branding on them.  Below is a photo from the owners manual of the M series but this applies to all series of Dino's


The replacement regulators today are not hard to find and not terribly expensive either. Their insides are identical to the original ones but differ in that they have the cover that reads Magnetti Marelli.

Also, to the very observant, there are two other differences. One is that the corners of the decal on the replacement regulators are rounded off and...


...the original regulators had the word FIAT included in the text. As such we decided to reproduce the decal exactly as it would have been on the original factory delivered regulators.


Here is the final result. We used the same sub surface print method and 3M adhesive to yield an almost indestructible decal that will serve well for at least another 40 years.

Tuesday, December 17, 2013

Wheels and Veals: McLaren Toronto mounts our tires giving a reason to celebrate

We are not going to lie when we say that we were scared to death to have the tires mounted to the wheels. So much work went into getting the wheels perfect that we just did not want them damaged while having the tires fitted.

To this end we called upon the experts at McLaren in Toronto to take away our fears and they were magnificent. Their lead tech immediately understood the importance of the task and was particularly gentle as the Dino is a personal favorite of his. While installing the tires he schooled some of the junior techs on the wheel finish, understanding the great lengths we went to achieve an authentic looking finish, while the younger guys are all used to seeing high gloss blemish free wheels.

The result is nothing short of what you would expect from McLaren; not the slightest mark anywhere. The immediate release of tension called for an Italian celebration in the form of veal sandwiches and Brio soft drink :)


Sunday, December 15, 2013

Pininfarina Perfect: Getting expert help to restore the body badge

One of the hallmarks of most Ferrari's is the badge that denotes that car as having been designed by the famed Italian styling house Pininfarina. It is a favorite detail of mine and one that was not going to get anything less than 100% attention.

Our badge was tired and our initial thought was to buy a new one as they are readily available and not very expensive. As we looked though it became clear that, while new production badges look great, they differ slightly from the original ones. This was unacceptable so we embarked on the path of exact restoration.

The first step was to remove the printed plate from the cast aluminum backing. This backing was anodized aluminum so the anodizing had to first be stripped chemically. Once stripped Paul set to work with tiny sanding blocks and endless patience to remove some 40 years of mechanical damage. The base was then polished by hand to the correct luster and sent to anodizing to re-create the original coating (a process that took two tries to get right)

With the base done we turned our attention to the badge itself. Here we scanned the plate and pixel by pixel created print artwork. This artwork was taken a few doors down where our trophy making specialist Joe was eager to assist. Joe found a base metal with exactly the same brush pattern as original and then proceeded to print our artwork via a heated dye sublimation process exactly replicating the original plate. The final step was a detail trim and it was off to final assembly.

Yes it was a hundred times more work than just buying a new one but it was another original and notable part kept with the car.


Monday, December 9, 2013

Go Biggs or go home: Achieving the exact Dino Ferrari wheel colour


This is a tale of a man beating a computer (in fact several computers) proving that there is still no substitute for the human eye. One of the huge challenges that Dino restorers face is getting the colour of the wheels correct. It may sound like a simple task but the particular shade of silver that wheel manufacturer Cromodora used in the 1970's is incredibly difficult to replicate using modern paints.

Even period photos are of little use because the colour changes dramatically with different photographic techniques and period brake pads were very dusty meaning that it was near impossible to drive more than a few miles without a coating of brake dust spoiling the colour.

Our journey began with locating some wheels with perfect un-molested original paint. To this end we generally looked at wheels under where the tire goes as this paint would have never been exposed to light. In addition we used spare tire wheels to ensure that temperature was not an issue either. In addition we were able to find an NOS wheel that sat in a box for decades. With our sample pool we were able to determine a consistency of colour on which to base our formulations. Here is where things get hard. After going to all of the major automotive paint manufacturers and having them digitally scan the wheels for colour we found none of them able to produce a sample paint that was very close to the look of original.

It was at this time that we were put into contact with George Biggs who runs a restoration shop just north of Toronto. While George has mainly done American cars he has recently turned his attention to European exotics restoring a Ferrari Daytona to an exceptionally high standard and currently working on several Dino's.

George has two main strengths. One is that he is always willing to listen and learn (a trait seemingly absent in most 'experts' we have met) and he does not understand what it is to quit. These qualities allied to our strong desire for perfection meant that we spent an incredible amount of time together over the period of almost a year to get the wheel colour just right.

Literally GALLONS of paint of wasted and probably close to a hundred paint samples were sprayed out until the colour was perfect. The problem was that as little as ONE DROP of the wrong toner in a quart of paint drastically changed the finish.

Once the colour was established, George and his crew took on the arduous task of prepping and painting the wheels. This is a time consuming process where workers were changed up once their fingers started bleeding (which was often). Particular care was taken to maintain the sharpness of the original lettering while maintaining original imperfections to make the wheels look freshly cast. Once prepped the wheels were painted using a rolling method to ensure even paint distribution. Believe me the work involved was extreme.

I know many of the blog followers now would like me to publish the paint formula but it is not ours to share. We did a deal with George that he owns the formulation at the end of the process and we are abiding by that agreement. This is more than fair as George can be well trusted to deliver a perfect result and should be allowed to recoup some of the free time he put into the project. He can be contacted directly at www.bodybybiggs.com

We thank him for his involvement and enthusiasm and were happy to have him be a part of our restoration.

Now for some pics of the wheels. Please note that the wheels are very hard to get the colour right with the camera but in person they are dead on in both colour and gloss.


Sunday, December 8, 2013

Father & Son time: The journey to get the Dino on wheels

After what seemed like endless individual restoration projects the time came to finally put it all together. We urge you to go over some of our old posts to see some of the many suspension and steering parts in process during restoration.

With all the parts looking shiny and new it was now time to get to the business of bolting them onto the car. By popular request this will be a photo rich post as the results are really quite nice in the flesh.

First a photo of the wheel well all stripped and ready to assemble


Dad seems happy to see the first suspension arm go on


Brake rotors were Blanchard Ground. Much more accurate than traditional rotor machining and the standard in racing applications. The finish given by this method acts as the perfect surface for the brake pads to seat to.


It was one thing to see them off the car and quite another to see the shocks installed.


Rear swaybar link with correct nylock nut with yellow plastic insert. Orientation of all fasteners are as per the parts manual.Yes these details matter :)


The rear is coming together


With rotor and calipers this corner is ready for a wheel.


On to the front


Wheel well finishing with sardine type strap holding the fresh air duct. Just like original right down to re-using the factory made pop rivet holes.


Front ball joints fitted with castle nuts, cotter pins, and marked with yellow paint. New ball joints use nylock nuts here so we had to track down original castle nuts and drill the fasteners.


Another view of the front corner


Last step was filling the hydraulic system and bleeding the brakes. Here we are bleeding the master cylinder using a simple setup to re-circulate the fluid.


Wednesday, December 4, 2013

The time it takes: Accounting restoration hours

Over the course of our posts we have often talked about how a particular project was an insane amount of work or consumed cubic hours to be complete. As we are doing this for leisure and not work Paul and I have never really put a clock to our time so we were never really sure of exactly how long some things took to complete. Recently we were faced with the need to restore a previously un-touched part and decided to keep score.

While setting up the electrics we discovered we had the incorrect windshield wiper motor. After a few days of diligent searching (totally un-tracked time) we found a replacement part in need of restoration. Below are photos of exactly what we received. It was a working but cosmetically un-restored wiper motor.


At this stage Paul and I took detailed track of our time to bring the motor up to finished condition. A few things to note:

 
- All work with the exception of plating was carried out in our place
 
- We had knowledge of exactly how to dis-assemble and re-assemble the motor so no time was lost 'learning'
 
- We worked diligently as if we were being paid for our time
 
- We did not take into account of our calculations materials consumed or the cost of sub-letting the plating
 
With all of these considerations and with no time wasted in the process we consumed a total of 8.5 man hours to restore this single motor. Multiply this over the many parts of an entire car and then factor in the time spent looking for parts and researching authenticity and you will see how incredibly easy it is for a restoration to go into the many thousands of man hours to complete.
 
Here are the pics of the finished result:


As a note I will say this post is the observations of a couple of amateurs taking note of their time. When dealing with a professional shop one of the things you pay for is their experience in both doing the work but also estimating the time it takes to do a job and communicating it to the customer. Professionals should be held to the estimates they produce and cannot run recklessly with billable hours at the customer's expense. Even this year's Pebble Beach Best of Show winning car was restored within an estimate and a budget. Open checkbook cars are more the stuff of legend rather than practice even with cars costing multiple millions of dollars.